Overview
I got my master’s degree in EE but I had never written a driver and the “driver” was a mysterious word to me. Thanks to the RTEMS project and mentors’ guidance, I brought up a minimum driver that can successfully send and receive can frames between BBB and Linux. This blog is not a tutorial from an expert. It is simply a beginner’s notes, recording how I gradually understood what a driver is and how to write one. Hopefully it can help another beginner get started more easily.
About project. RTEMS has a state-of-art CAN stack, but it doesn’t support the hardware BeagleBone Black(BBB) yet. My goal is to write a driver that enables RTEMS to use the DCAN controller in BBB.
What is a driver?
I use an analogy to help me understand “driver”. Driver is a bridge between operating system and hardware. With a driver, the commands from operating system can be delivered to hardware and be executed, the data from the hardware can also be forwarded to the operating system. If the driver works, software and hardware can communicate. Then next question is how to write a driver?
How to write a driver?
Since a driver is the bridge of software and hardware, it needs to communicate with both software–RTESM, and hardware–BeagleBone Black DCAN controller.
That said the driver needs to have RTESM API and the DCAN controller register address.
For the software side, with RTEMS, we need to know how to use the CAN API, RTEMS CAN Driver link. This is the part I am going to work on next and will update later.
For the hardware side, we need to understand how the CAN controller works, which means to read the Technical Reference Manual, to understand the logic of the hardware. In the driver, we will map the address of the register and writing codes to read or write values to these registers, and then achieve the function of driver. Hardware side is the focus of this blog.
Mindset: Don’t Prepare Forever
At the beginning, I wanted to read the entire Technical Reference Manual (TRM). I wanted to understand every register, every CAN protocol detail, every RTEMS interface…and then start writing code. But it took several days and I was still at the same place and felt pressure.
Fortunately, my mentors kept encouraging me to write code first. Looking back, that was absolutely the right decision. I learned much more by making one register work than by reading one hundred pages.
My experience became:
Read a little - Write a little - Debug a little - Read again
instead of
Read everything - Try to understand everything - Finally start coding
Driver development is highly practical. Theory and practice should move together.
Write a simple app to test
Write a .c file and use RTEMS build tools to build the app. This step is also scary for me at first. Follow this Link to build your first hello world app. Learn ./waf is build command, wscript is the file for organizing your codes.
Build a repo on GitLab
Build a repo and commit a little every day.
Before Writing a Driver, Make Hardware Work
One lesson saved me a huge amount of debugging time. Before blaming the software, verify the hardware first, and used candump cansend to verify Linux-to-Linux communication.
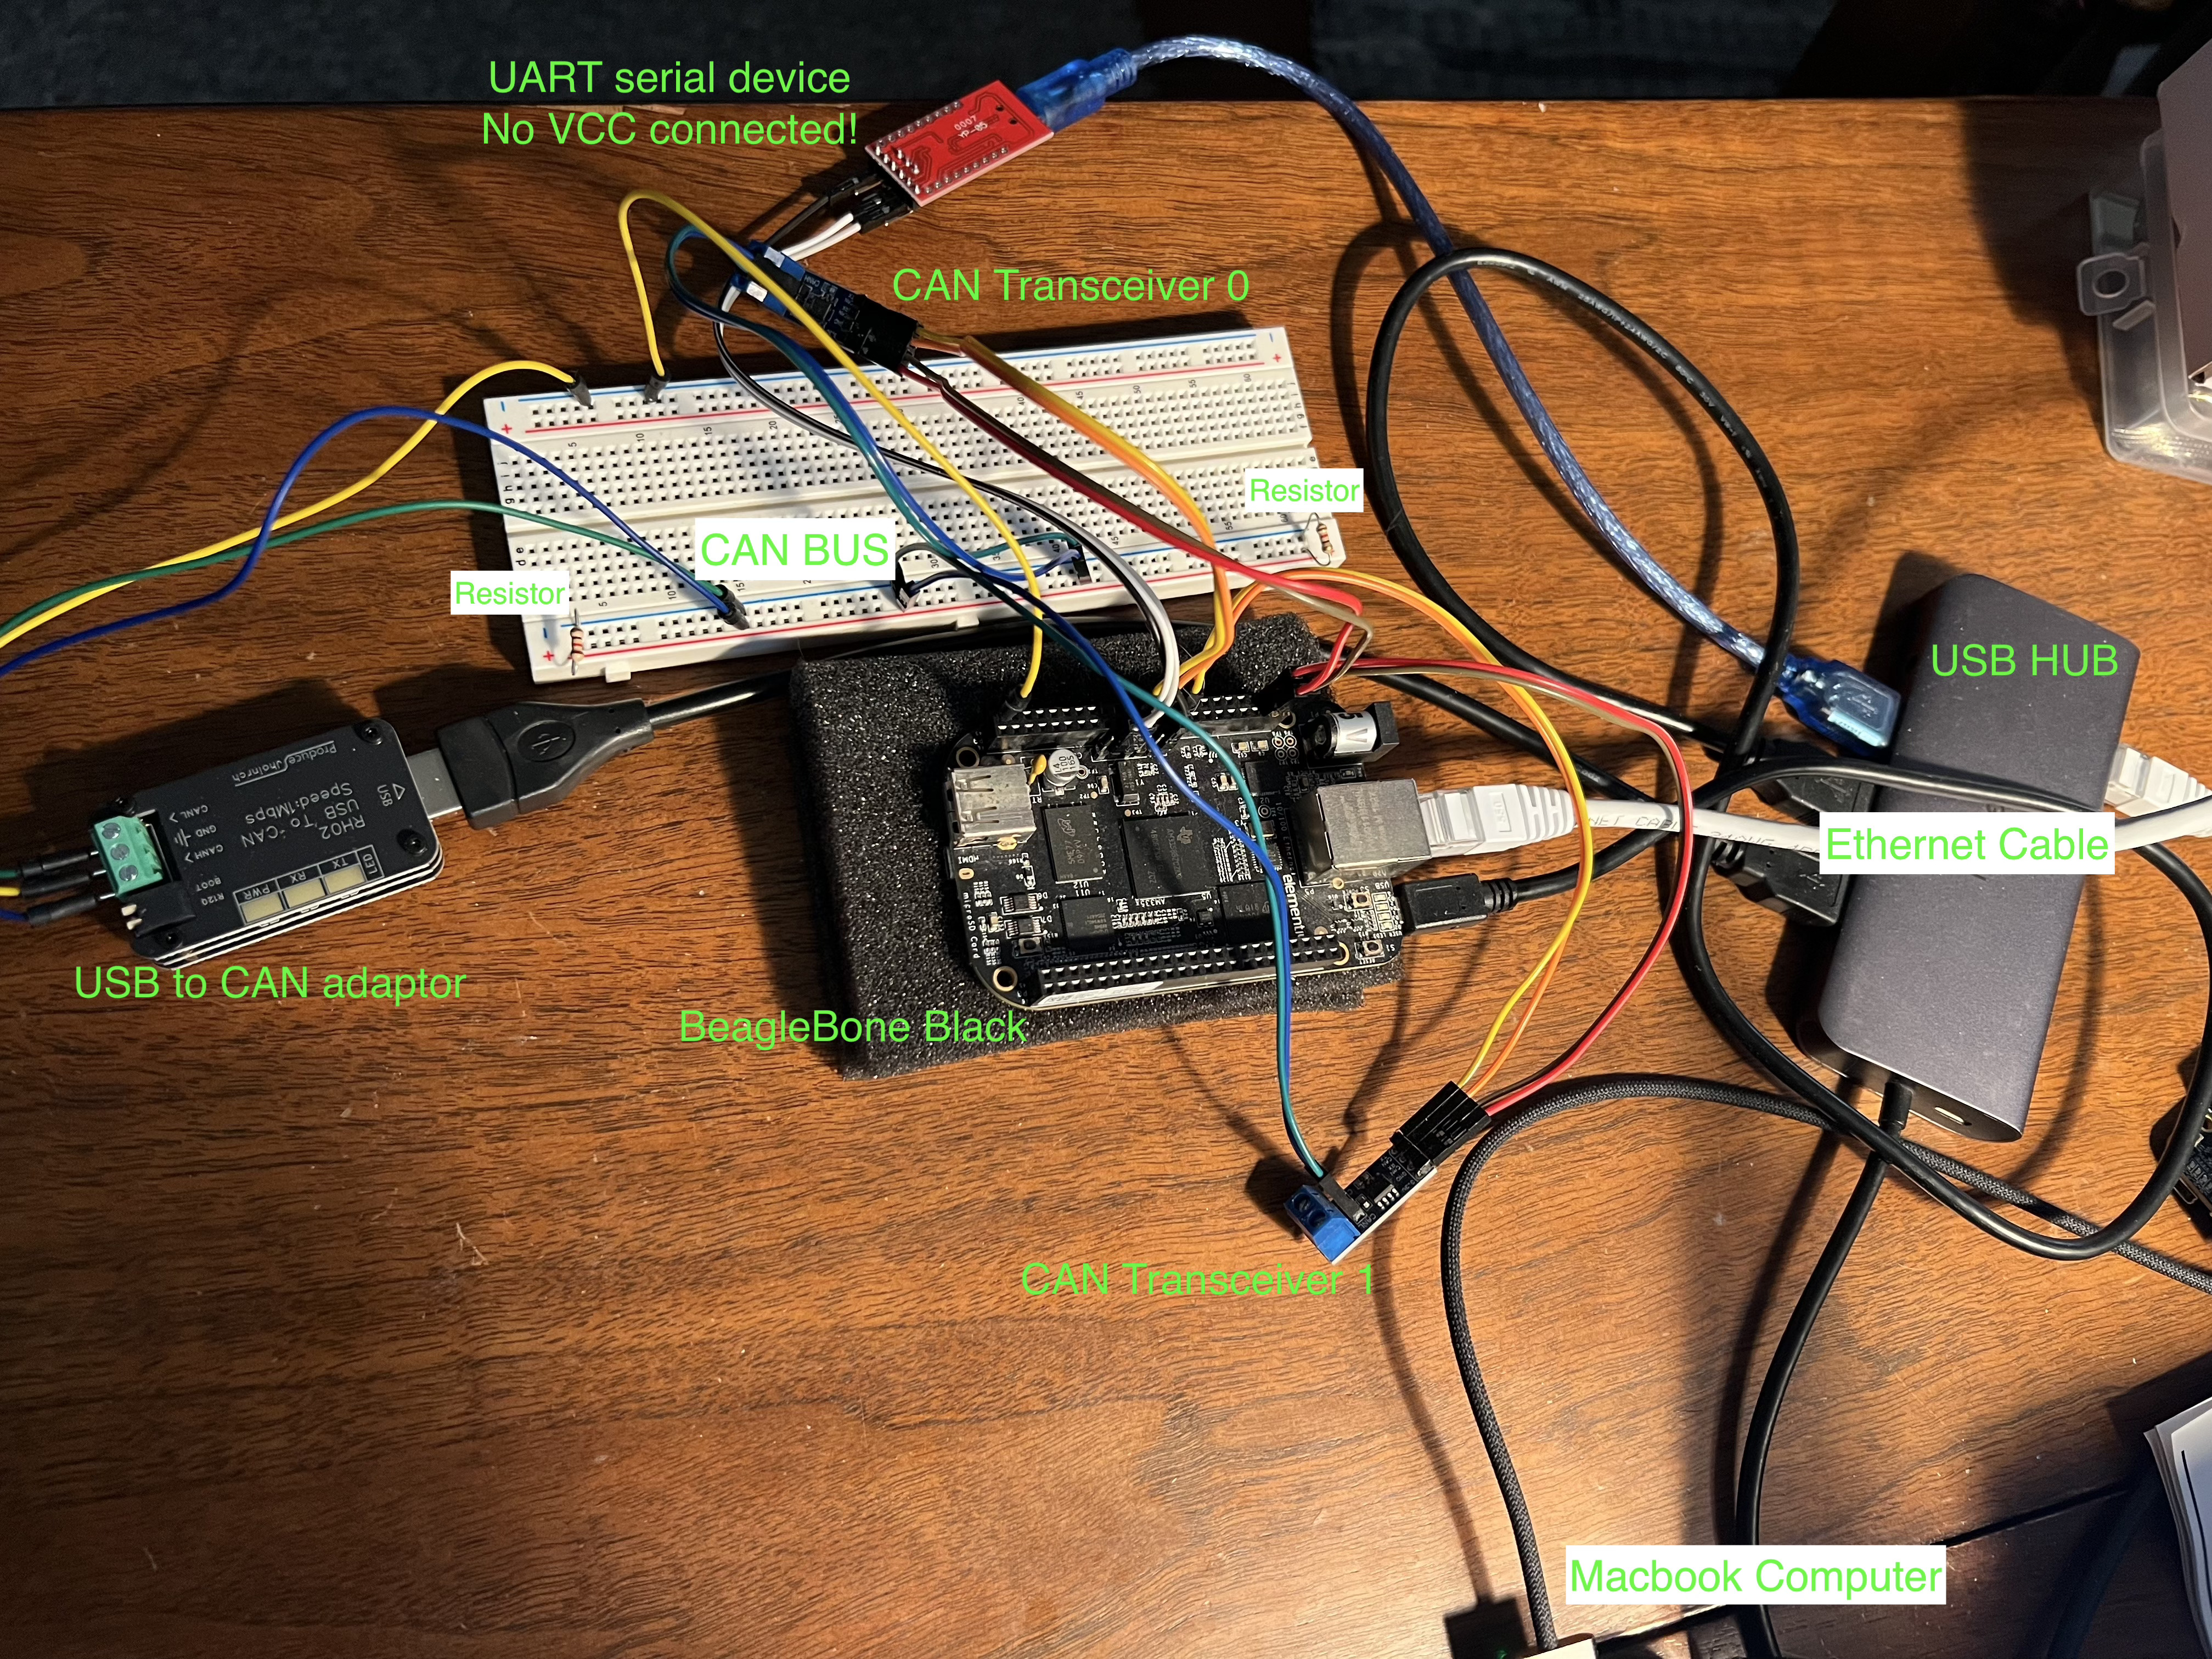
For my project, I connected
BBB Linux - AM335x DCAN1 - CAN Transceiver - CAN Bus - USB-to-CAN Adapter - UTM Linux SocketCAN
If Linux can successfully send and receive CAN frames, then I know:
- CAN controller works
- CAN transceiver works
- CAN bus wiring is correct
- Bus termination is correct
- USB CAN adapter works
- SocketCAN configuration works

At that point, the hardware becomes a pair of swimming floats. I can learn and grow with a solid hardware foundation. The debugging scope becomes much smaller.
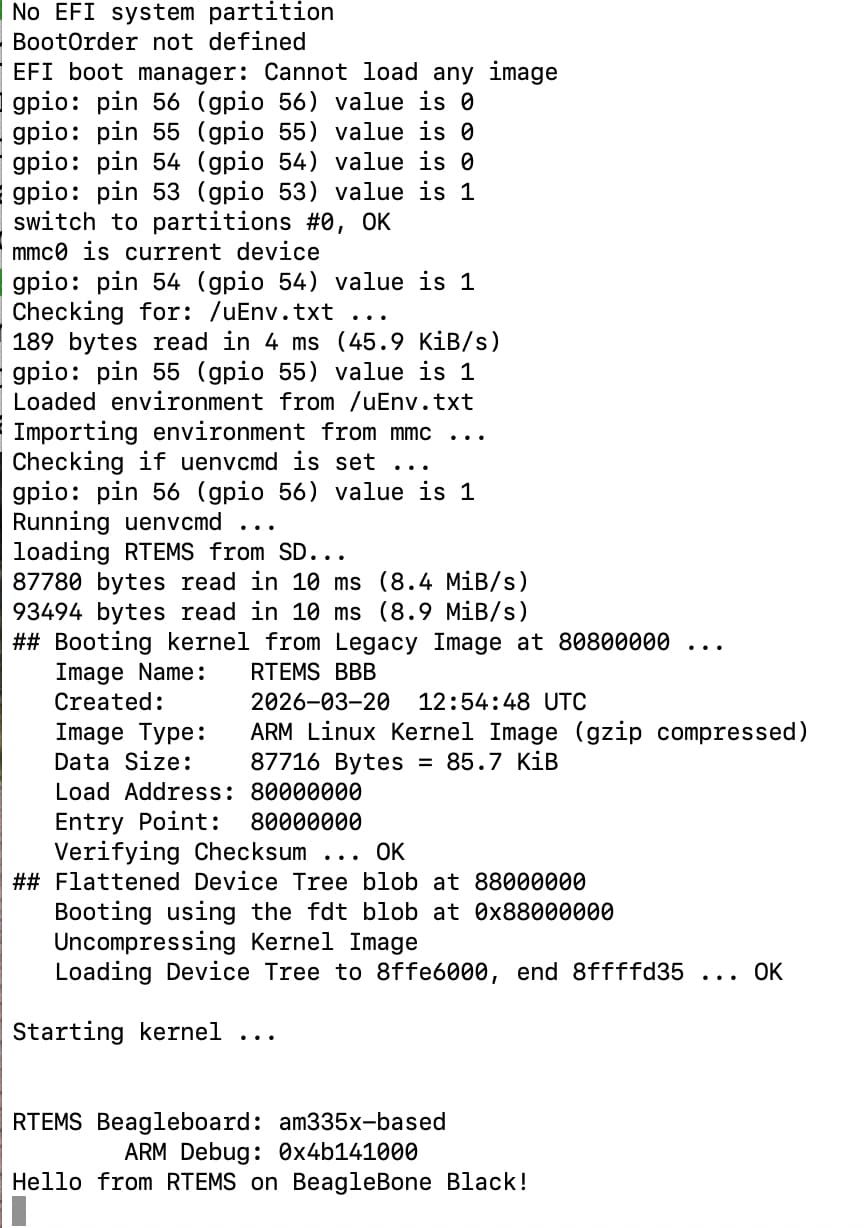
BBB TFTP Ethernet Boot
I first tried to flash SD card to boot on BBB. It works, but it is just very slow. Then learned from mentors that TFTP boot is a more efficient way.
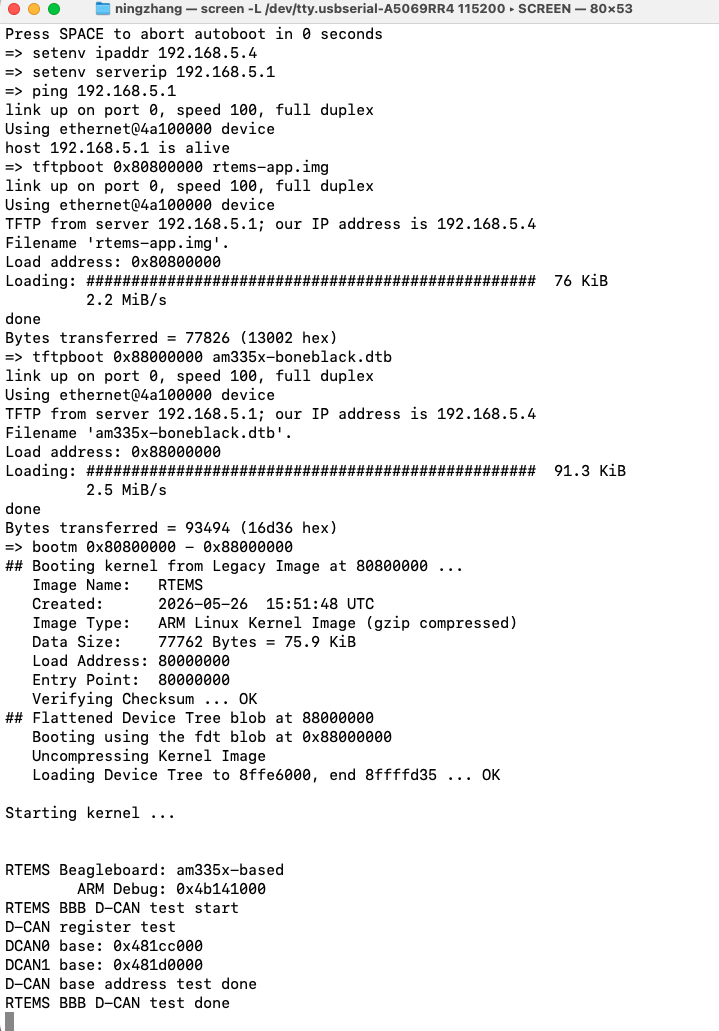
I built a TFTP connection between BBB and my computer through a Ethernet cable. I used TFTP to transfer the image file from my computer to BBB to test.Booting via Network
UART serial
The results on BBB needs to be seen. One way is connecting a monitor. Another is use a UART serial device.
I used a UART serial to connect with BBB and then my computer. On my mac computer in a terminal I used the following command
screen /dev/tty.usbserial-A5069RR4 115200
to see the output on BBB.
CAN transceiver
BBB doesn’t have a transceiver, so we need a external transceiver.
USB CAN adapter
The adaptor allows the CAN frame to be sent to computer. Then UTM Linux in my Mac can receive the CAN frame.
CAN Bus
I used a bread board as CAN Bus. Make sure there are 2 120Ω-ish resistors at both ends of the CAN Bus.
Driver Bring-up Process
My bring-up process looks like this:
Register access - Clock enable - Pinmux configuration - Bit timing configuration -

TX Message Object - Hardware validation - debug - TX success -

RX Message Object - debug - RX success -

Interrupt pending - RTEMS CAN stack integration
At first I thought I was writing a driver. Actually I was solving one very small problem after another. Write a small function to read back a register value is a good start. I started from reading DCAN0 and DCAN1 base address. It feels good to see the hardware address pop on the screen.
Registers Became Less Scary
At first, seeing names like these felt overwhelming.
DCAN_CTL
DCAN_ES
DCAN_BTR
DCAN_IFARB
DCAN_IFMCTL
After debugging for a while, I realized: Registers are simply variables inside hardware.
Reading DCAN_ES is similar to reading a C variable.
Writing DCAN_BTR = value is similar to assigning a value.
The only difference is that these variables live inside hardware instead of RAM.
And when I don’t know what is the meaning of the register, it is the time to go back to learn TRM. All registers information are in TRM.
TX and RX Are Independent Milestones
TX
The first successful transmission was exciting.
RTEMS BBB -> CAN Bus -> UTM Linux
Linux successfully received
123 [8] 11 22 33 44 55 66 77 88

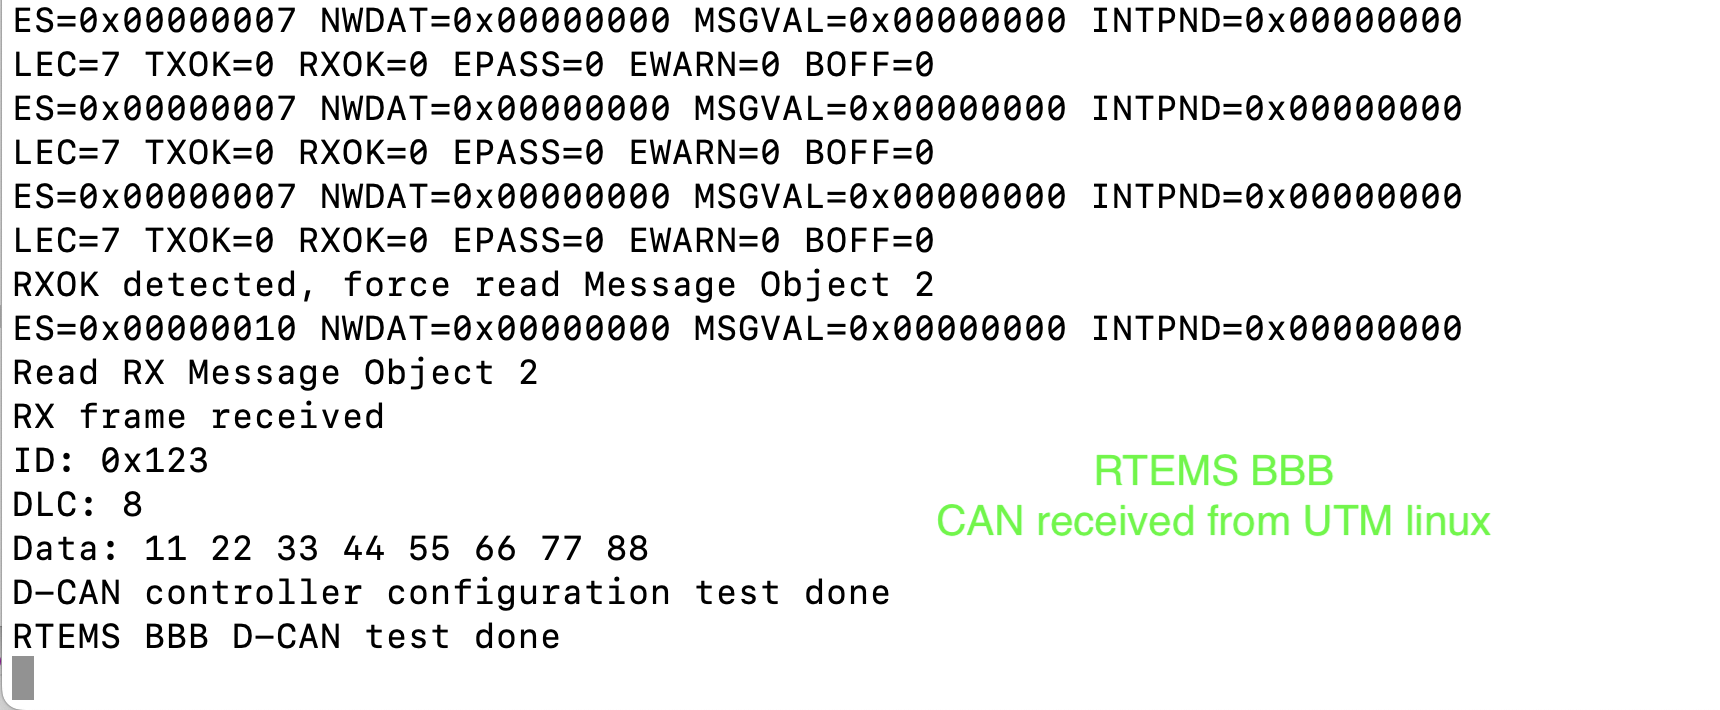
RX
UTM Linux -> CAN Bus -> RTEMS BBB
RX debugging takes longer time. I found NWDAT register value never changed, but during the test, RXOK worked, which means a new frame come to the CAN Bus. So I use RXOK as a flag to read the value from message object RAM and in polling mode it worked. Then I tried to read the value of message object based on interrupt, which is a normal way in a driver.
Finally I switched to polling the DCAN_INT register and successfully detected:
DCAN_INT = 0x00000002
which means Message Object 2 generated an interrupt.
Reading Message Object 2 produced
ID: 0x123
DLC: 8
Data:
11 22 33 44 55 66 77 88
Every debugging step improved my understanding of how the controller actually works.
Ask mentors for resources
For the project of writing a driver, usually it is not a new thing in this world. Maybe just only new to beginner. So one thing I learned is, there are many resources related the work I am going to do. Do not think you are all alone and build all the things from scratch. There are lots of resources and support. If you cannot find the information, ask your mentors. I really appreciate my mentors for providing me many useful resources that helped me have a good start.
Learn by Building
One thing surprised me. Many concepts that looked difficult on paper became very simple after implementation.
For example, before:
Message Object
Interrupt
RXOK
DCAN_INT
looked complicated. After implementation knowledge became much more intuitive.
CAN frame arrives -
Message Object stores frame -
DCAN_INT points to Message Object 2 -
Driver reads Message Object -
Software gets CAN frame
My Biggest Lesson
I used to think writing a driver meant writing thousands of lines of complicated code. Now I think writing a driver is mostly about building step by step. Read one register, enable one clock, configure one Message Object, send one CAN frame, receive one CAN frame. One small success leads to another. Eventually, the minimum driver starts working.
Next Steps
The current driver can already transmit and receive CAN frames. The next goals are:
- understand interrupt flow,
- implement ISR and worker thread,
- convert hardware frames into software structures,
- integrate with the RTEMS CAN stack.
The driver is still under development. But the biggest change is through step by step development, the word “driver” is no longer mysterious.
Final Thoughts
As beginners, we often feel we need to understand everything before starting. My experience is exactly the opposite.
Start building. Read when necessary. Debug patiently. Repeat.
Driver development is not about knowing everything. It is about solving one small problem after another until the hardware finally responds. And when the first CAN frame appears on the screen, all those registers suddenly become much friendlier.